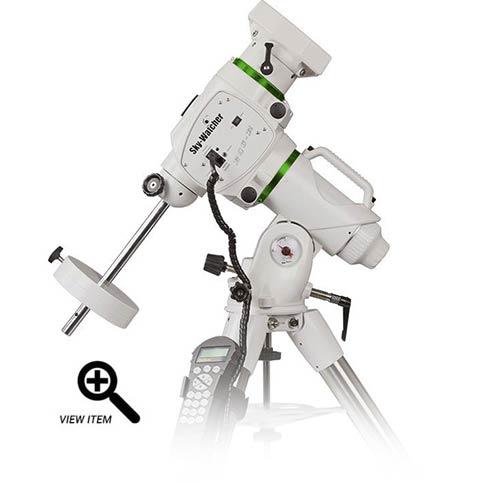
Sky Watcher Eq6 R Pro Equatorial Go to Mount Review

The Sky-Watcher EQ6-R Pro is a computerized equatorial telescope mount with GoTo capabilities. This equatorial (EQ) mount is capable of providing precise, accurate tracking of the night sky, and is suitable for long-exposure astrophotography.
The core specifications of this equatorial mount include having a built-in ST-iv autoguider port, a payload chapters of 44 pounds, and a SynScan computer hand controller with an extensive database of objects.
I have been using the Sky-Watcher EQ6-R Pro telescope mount since October 2018, and have used it to capture several deep sky images of nebulae, galaxies, and star clusters in space. In this post, I'll share some of my favorite features of this EQ mount that I have experienced over several imaging sessions in the backyard.

Some of my favorite photos captured using the EQ6-R Pro.
Whether you already own the EQ6-R Pro and are looking to tap into more of its features, or are trying to decide which equatorial mount is all-time for your visual observation or astrophotography goals, this article should offer up some useful input from someone who'southward been in your shoes.
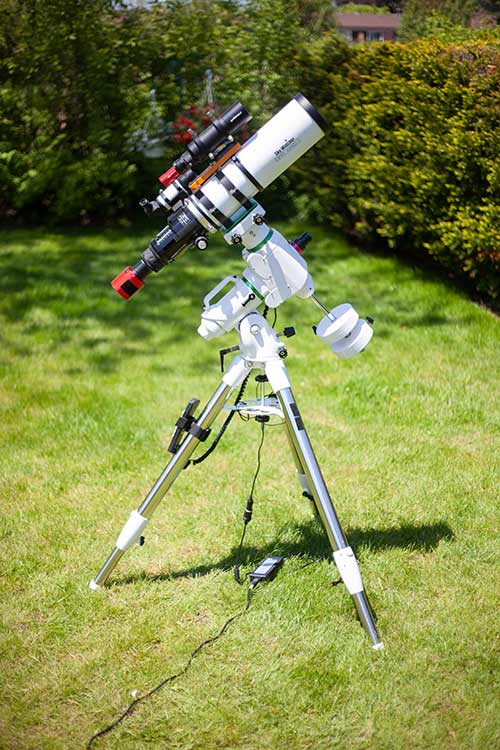
Related Video: My first run with the Heaven-Watcher EQ6-R Pro in the lawn
Sky-Watcher EQ6-R Pro Review
Before we swoop into some of the interesting features you may non have known about, here is an overview of exactly what the "EQ6" is capable of. As a preface, it's worth noting that I employ this mount for astrophotography exclusively, and I am in the northern hemisphere.
For those in the southern hemisphere, the procedure is very similar all around, aside from polar aligning the mount with the s celestial pole (SCP).
Before stepping upwardly to the EQ6-R, I used a number of intermediate-level astrophotography mounts, including the slightly smaller HEQ5 Pro SynScan model.
The Basics
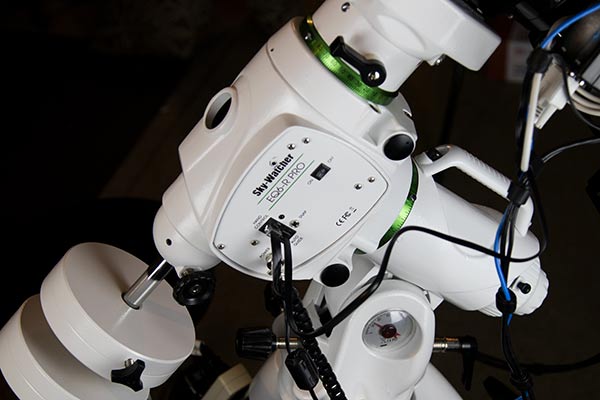
The EQ6-R Pro includes a SynScan hand controller with an LCD brandish that gives you command information technology's features and basic functions. The left and right keys on the keypad control the Correct Ascension (RA) centrality, while the upwardly and downward arrows are used to control the Declination (DEC) centrality.
You tin can control the slew speed past selecting the Charge per unit shortcut push button (2) on the keypad, as it is useful to make large movements at a loftier speed, and subtle adjustments using a slow speed. The Sky-Watcher EQ6-R Pro has x slew speeds for complete control over the motion of each axis.
Before powering up the EQ6-R, your telescope should be in the domicile position. This means that the EQ head is leveled on the tripod, and the RA axis is pointed towards the north celestial pole (NCP). The counterweight should be at its lowest position, and the telescope should be pointing towards the NCP. Y'all can then turn on the mount and select the operation mode.
For those interested in astrophotography, you will only always want to utilise the mountain in EQ mode.
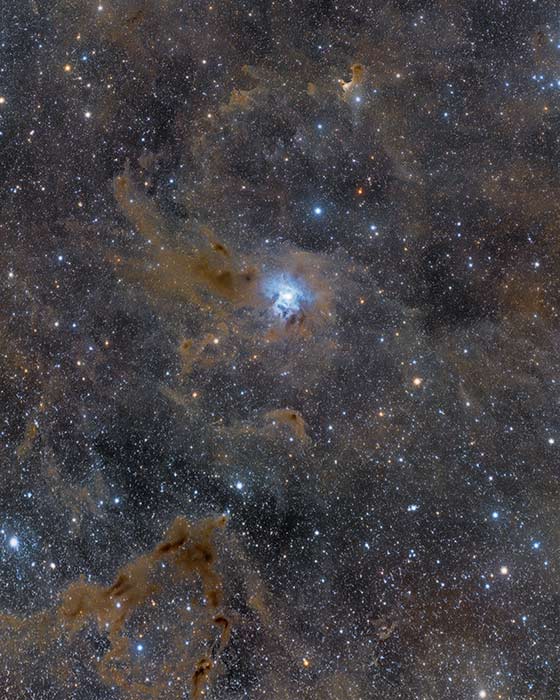
The Iris Nebula captured using the EQ6-R Pro and RedCat 71.
With the RA and DEC clutches locked, and counterweight(s) fastened, yous can mount your telescope on top of the EQ head. This is accomplished by fastening the mounting plate of your telescope to the saddle, which accepts both D and V-way mounting plates.
If you are looking for a nice upgrade, the Dual EQ6R-Pro Forty collar was redesigned to fit the EQ6R-Pro and features 2 large locking hand knobs and bound-loaded jaws.

Dual EQ6R-Pro Xl neckband
Getting Started
Once the SynScan system has initialized, you can enter in the geographic coordinates of your observing site.
This involves entering the latitude and longitude coordinates of your electric current location using the cursor on the LCD display and the keypad. So, yous will enter your electric current time zone, which for me, happens to exist UTC -four in southern Ontario.
Y'all tin can also enter in your current superlative, which is used for atmospheric refraction compensation (generally, the higher your peak, the better). Adjacent is setting the current date and time, and whether you are currently on daylight savings time.
In one case all of these important details have been entered (and so the mount understands what is available in the sky from your location), you reach the mount alignment process, with the "Begin Alignment" dialog served upward on the LCD screen.
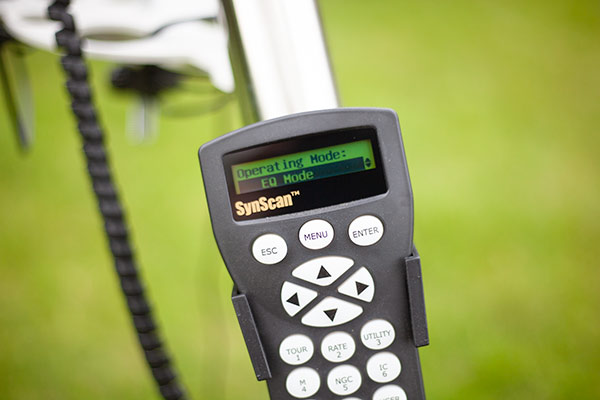
The SynScan Hand Controller set to EQ Mode.
Use the "Park" Feature
This simple, nevertheless useful feature automatically aligns your telescope mount in both axes at the beginning of your imaging session. It is not sectional to the EQ6-R Pro, still it is piece of cake to miss if you don't follow the instructions in the manual on your first few runs.
This feature is located under the "Utility Part" menu and asks you to plow off the mount subsequently the park position has been confirmed. The adjacent fourth dimension you turn the mount on, you will see a dialog on the LCD display request if you would like to showtime from the park position.
This is a handy characteristic that I did non personally take advantage of for the first few months of buying with the mount. It is nice to confirm the dwelling house position when setting upwards, especially before beginning your polar alignment procedure.
The EQ6-R is Piece of cake to Polar Align
Whether y'all use the built-in polar scope with the illuminated reticle or use a QHY PoleMaster device, polar aligning the EQ6-R is a breeze.
This is largely due to the fact that the EQ6-6 includes large, Alt/Az adjustment bolts with comfy handles. Fine-tuning the polar centrality of this equatorial telescope mountain is possible cheers to these convenient controls.
The built-in polar finder scope with an illuminated reticle allows you to accurately polar align the mount without the need for additional software or accessories. You can either employ a tertiary-party mobile app like "Polar Finder" to detect out the current position of Polaris or simply use the information displayed on the SynScan hand controller.
The SynScan manus controller displays the position of Polaris in polar scopes field of view (FOV). You need to imagine that the large circle in the FOV of the polar scope as a clock'south face with 12:00 sitting at the peak.
And so, it'due south simply a affair of adjusting the Alt/Az bolts of the mount to place Polaris in the "HH:MM" position provided.
Using a PoleMaster with the EQ6-R
If y'all don't like getting underneath the polar telescopic for a existent-time view of the NCP or SCP, the QHY PoleMaster is a bang-up option. This electronic polar telescopic uses a pocket-size camera to display the region surrounding the north (or s) celestial pole.
Using the live feed through the photographic camera, yous tin fine-melody your Alt/Az adjustments in a very precise manner. The PoleMaster requires the appropriate adapter (this is the one you need) to fasten it to the polar axis.
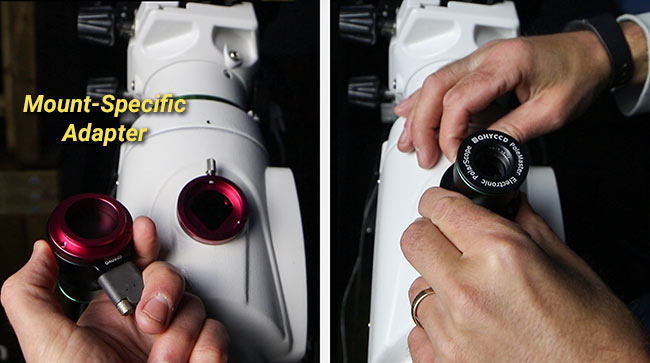
Fastening the PoleMaster to the EQ6-R using the necessary adapter.
Yous Can Meliorate the Alignment Accuracy
Before running a star alignment routine, brand sure that your telescope is well balanced, and that there are no loose cables that could get caught and snag on the mount.
The alignment routine involves choosing a bright, named star from the database and centering it in your telescope eyepiece or camera. The LCD screen displays "Choose 1st Star", at which point you can bicycle through the list to discover a star that is not blocked by any obstructions from your location and press enter.
A word of circumspection here, once y'all striking enter, the mount will kickoff to slew to the object immediately.
From hither, it'south a thing of using the pointer buttons on the keypad to center the star. Retrieve, y'all can change the slew speed at any time by pushing the "Rate" button and setting the value higher or lower.
It is often useful to leverage a finder scope on your telescope when slewing to your get-go alignment star, as it has a much wider field of view than your primary telescope and makes finding the first star easier.
When running through a star alignment routine, information technology is of import to consistently center the alignment star in the eyepiece or camera's FOV. It is benign to employ a reticle eyepiece with a small FOV.
Personally, I utilise the camera'due south FOV and center the star on my DSLR display screen (with filigree-enabled), or with a cross-hair overlay in my camera control software (Astro Photography Tool).
You tin can run a 1,2, or 3-star alignment to improve the pointing accuracy of the telescope. This is very of import when it comes to photographing deep-sky objects that are nearly invisible until a long exposure prototype is collected.
Avoid Errors due to Mechanical Backlash
You can improve your alignment accuracy by fugitive errors due to mechanical backlash. Backlash is present in all equatorial telescope mounts and does not affect your observing enjoyment, or your long exposure images when autoguiding is employed.
To avoid introducing alignment error caused past backlash, eye the alignment star catastrophe with Upwards and RIGHT directions from the keypad. If you overshoot the star using this method, utilise LEFT and Down to bring the star back down the FOV and try once again.
The Stepper Motors are Repose
If you lot haven't used this particular mount immediate, you may be wondering what the EQ6-R sounds like while it is slewing. I have heard many astrophotography mounts over the years, and this one is impressively serenity.
This mount uses stepper motors with a 1.8° step angle and 64 micro steps driven. This technical design attribute results in a quieter mount than on using servo motors.
This means that even at the maximum slew speed (9X), the mount emits a minor hum that will not wake up your neighbors. While the telescope mount is tracking, it is completely silent. It's simply when you lot move the RA or DEC axis at tiptop speed that you hear a dissonance.
Compared to other equatorial telescope mounts I take used, the audible sound the EQ6-R Pro makes is more than acceptable. When you are partaking in a hobby that takes place (lonely) outside at night, avoiding loud or unusual noises when possible is always a good idea.
In contrast, the Celestron CGX-L computerized mount is noticeably loud while slewing at elevation speed. If this mount is being used in a closed observatory, information technology's not an result. All the same, I prepare my equipment in a city neighborhood lawn. Depending on the time of nighttime, I hesitate slewing to a new target because of this trait.
The Autoguiding Performance is Impressive
The Sky-Watcher EQ6-R Pro delivers impressive results when the built-in autoguider port is leveraged. Over the years I have maximized the tracking capabilities of my astrophotography mounts by using an auxiliary guide scope and photographic camera to autoguide using free software chosen PHD2 guiding.
The EQ6-R Pro allows you to set change the default automobile guide speed of the mount of 0.5X to 0.75X or 1.0X in the setup carte.
I take experimented using a guiding rate of 1.0X and saw niggling improvement to my guiding graph in PHD2 guiding over the default speed of 0.5X. The signal is, y'all take the option of adjusting this setting if the need calls for information technology, and it'south a characteristic I've merely recently tapped into on the EQ6-R Pro.
For a real-life instance of the autoguiding performance, you can expect with this mount, accept a look at the screenshot beneath. The guiding graph shows that my total RMS error is 0.63″. Generally, a total RMS error of under 1-second means that you can expect pinpoint stars in your long exposure images.
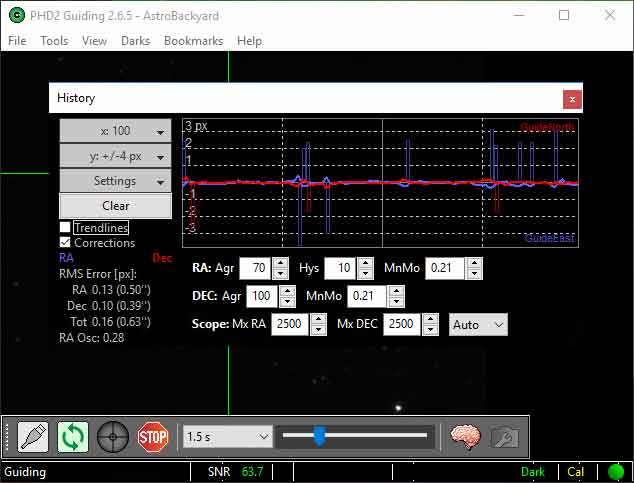
My autoguiding graph in PHD2 guiding using the Sky-Watcher EQ6-R Pro SynScan mount.
The Mountain is Heavier Than it Looks
When it comes to equatorial mounts for astrophotography, being heavy is a good thing. Even so, I think some people that receive their EQ6-R for the showtime time may exist a petty surprised at how heavy the EQ6-R actually is (I was).
The weight of the EQ caput is 38 lbs on its own, and the tripod adds some other 16.5 lbs. Add in 2 eleven-lb counterweights, and you've got a telescope rig that weighs 76.vi pounds and is not going anywhere for a while.
Luckily, the EQ caput includes a useful comport handle that I accept certainly put to adept use. Likewise, the supplied counterweight bar is retractable, which makes transporting the mountain out the door of my garage a footling easier.

I used to carry my Sky-Watcher HEQ5 Pro SynScan effectually the yard with the telescope and counterweight attached. It was heavy and awkward, only manageable.
This is non possible with the EQ6-R, which is understandable because the increased payload chapters (44-lbs) of the mount. To send the Sky-Watcher EQ6-R from my detached garage to the chiliad, I must remove the counterweights and the telescope first.
Information technology's possible to lift the tripod with the EQ caput fastened (54.five lbs), merely this is likely too heavy for most folks. The good news is, this heavy profile means that accidentally bumping the polar alignment out of position by kicking a tripod leg is unlikely. Smaller, ultra-portable mounts like the iOptron SkyGuider Pro do non share this quality.
Y'all Don't Need to "Mod" the Mount
If you're a tinkerer, I get it. It may be tempting to you to open up the EQ mount head and take a look. I would advise against this personally, every bit yous may do more damage than practiced.
I've seen a number of posts and videos discussing "belt-mods" and "hyper-tuning" Heaven-Watcher NEQ6 and EQ6-R mounts. Personally, I wouldn't recommend opening up the mountain in hopes of tweaking functioning, fifty-fifty if the underlying mechanics are straightforward to you.
In my feel, the Sky-Watcher EQ6-R can rails accurately for 10-minute exposures (or longer) without any re-greasing or modifications to the worm gears when autoguiding is leveraged.
I suggest spending the time to get your residual and polar alignment spot-on before blaming the mount for bad tracking. It's like shooting fish in a barrel to go caught up in scrutinizing the mechanical backlash and periodic error present in the mount.
If yous do dive into these advanced adjustments, you better be mechanically minded and gear up to invest a "minimum of four hours" for a typical belt modification.
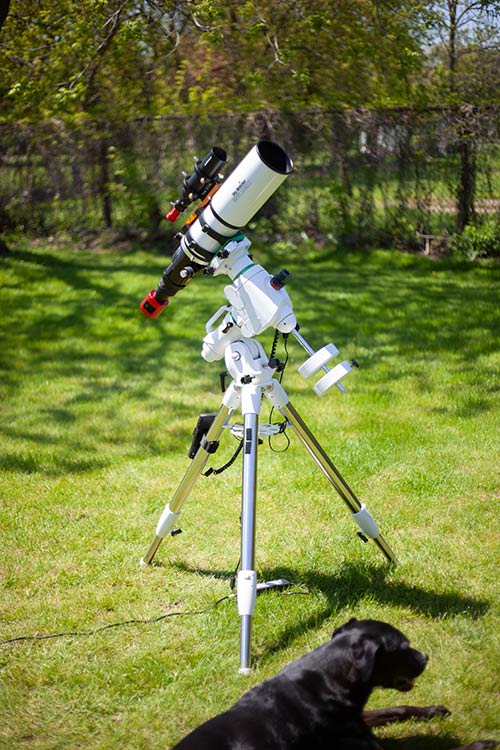
The EQ6-R with a Sky-Watcher Esprit 100 ED APO attached.
The SynScan Hand Controller gives y'all Extensive Options
The included SynScan mitt controller includes an impressive 42,000+ object database, with nearly every possible target you could ever want to observe or photograph.
The Messier object list gets a lot of use for apprentice astronomers in the Northern Hemisphere, while the NGC itemize is great for pointing the telescope at more obscure nebulae and star clusters.
The database as well includes IC and Caldwell catalogs, which covers most of the noteworthy subjects in the night sky. I only wish the database included the Sharpless catalog, for items such equally the Tulip Nebula with no culling designation.
To slew to these objects, information technology may be better to control the EQ6-R using your PC using a supplementary PC-Link cable along with the advisable ASCOM drivers and software.
I utilise the hand controller to align and heart my target. After a quick polar alignment routine using the QHY PoleMaster, the pointing accurateness of the mount is spot-on using but a one-star alignment.
After y'all're aligned and ready to discover or image an object in space, you can start past choosing a target using the "OBJECT" shortcut cardinal, which contains the following object list:
- Named Stars
- Solar System
- NGC Itemize
- IC Catalog
- Messier Catalog
- Caldwell Itemize
- SAO Catalog
- Double Stars
- Variable Stars
- User Object
- Deep Sky Tour
The deep sky bout is a very cool feature for visual ascertainment sessions. Imagine a star political party or public outreach effect where yous want to accept the all-time listing of targets at the gear up.
This feature generates a list of the near famous deep-sky objects that announced in the current dark heaven overhead. You simply go through the list and pick them off one by one.
The Periodic Error Correction (PEC) Feature
Periodic tracking error is present in all equatorial telescope mounts, and is due to the design of the internal gears. The Heaven-Watcher EQ6-R includes a periodic error correction (PEC) office to help correct this.
The PEC training procedure requires that you get-go polar marshal and star align the telescope mount. Then, slew to a star close to the angelic equator, and middle information technology in the telescope eyepiece or imaging photographic camera.
And then, navigate to the Utility Office > PEC Preparation way and press enter. From hither you can select the speed you would like to use for PEC training. The Sky-Watcher SynScan transmission suggests using 0.125X sidereal charge per unit for wider FOV telescopes such equally the Esprit 100 ED APO.
Subsequently selecting the speed using the "1" or "2" keys, the screen volition then showtime to brandish the elapsed time of the PEC training routine. Now, your job is to go along the star centered in the FOV using the left and right direction keys on the hand controller.
One time the PEC grooming routine has completed, the elapsed time will finish. Noe, you can select "PEC+Sidereal" as a tracking speed in the Setup menu. It is recommended to expect for at to the lowest degree 1 PEC training answer cycle to complete before y'all beginning taking your images.
Sky-Watcher SynScan Specifications
- Object Catalog: Messier Catalog, NGC, SAO, Caldwell, Double Star, Variable Star, Named Star, Planets
- Pointing Accuracy: Upwards to v arc-minutes RMS
- Tracking Charge per unit: Sidereal Rate, Solar Rate, Lunar Rate
- PEC: PPEC (permanent PEC)
- Database: 42,000+ Objects
- LCD: 18 Characters Ten 2 Lines (adjustable contrast and backlight)
- Keypad: Rubber with adaptable backlight
- GPS: SynScan GPS Modular (Optional)
- PC Connection: USB or RS-232X
- Power Output: Power Supply Voltage – 0.7V, Max. 100mA current output
Power Supply for the Heaven-Watcher EQ6-R Pro
As i Cloudy Nights forum fellow member put it, the Sky-Watcher EQ6-R Pro can get "cranky" if the correct ability supply is not used. I have experienced this effect myself, when I used an AC to DC ability adapter that did non provide a minimum 4 amps of power.
These days, I use a 12V AC/DC adapter with 6 amps to power the EQ6-R when plugged in at dwelling. Here is a picture of the verbal AC/DC adapter I use with the EQ6-R, and hither is a link to it on Amazon. Others have establish the Pyramid PS9KX v Amp power supply to work well with this mount.

The AC/DC adapter I use to power the EQ6-R Pro mount from home.
Final Thoughts
Equally you may have noticed, at that place is a lot to cover when discussing all of the features of the Sky-Watcher EQ6-R Pro SynScan computerized telescope mount. The very start night I used the EQ6-R, I captured one of my favorite astrophotography images to date, and I knew I was in for a long relationship with this mount.
A reliable equatorial mount is the foundation of every great deep sky astrophotography kit, and the EQ6-R is a worthy investment for those looking for a stable, long-term solution for long-exposure imaging.
From my early days with the HEQ5 Pro to my latest session in the lawn with the EQ6, I've been extremely satisfied with the user feel and performance of Sky-Watcher's affordable equatorial telescope mounts.

Pros:
- Fantastic Tracking when Autoguiding Used
- Placidity Stepper Motors even Slewing at 9X
- Easy to Polar Align
- Congenital-In PEC Training Feature
Cons:
- Heavier Than it Looks
- Intermediate Level Mount with Price to Match
- Power Supply must be Right or will Act Up
My Electric current Sky-Watcher EQ6-R Pro Setup (2022)
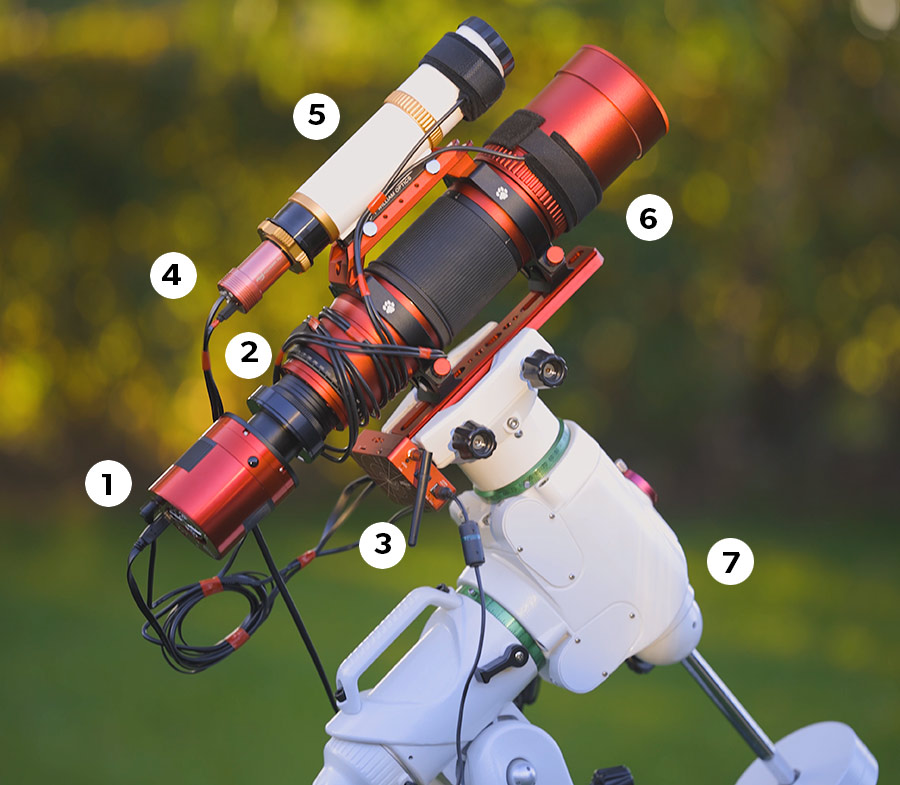
- ZWO ASI2400MC Pro
- Optolong 50-eXtreme Filter
- ZWO ASIAIR Plus
- ZWO ASI120MM Mini
- William Eyes Uniguide 50
- William Eyes RedCat 71
- Sky-Watcher EQ6-R Pro
What Others Have Said:
"This mount is simply astonishing. Information technology is robust and tracks very well. I was taking five-minute subs with no star trails. It is built like a tank and handles my Meade v″ refractor with ease. The stepper motors are quiet. It'due south simply a joy to use and I highly recommend it. The toll is well worth it" – James S. on HPS website
"This mount is a tank. I have been doing astrophotography for several years using a lighter weight mount merely I was set up to setup upwardly to a heavier payload mount and I am very pleased." – Ray on HPS website

The Heaven-Watcher EQ6-R Pro is Available at OPT

Useful Resources:
- Update the Firmware of your Heaven-Watcher EQ6-R Pro SynScan (Heaven-Watcher Website)
- The Complete User Transmission (Sky-Watcher SynScan PDF)
Practise you employ the Sky-Watcher EQ6-R Pro for astrophotography? If then, let me know your experiences with it in the comments. To stay upwards to appointment with my latest adventures in the lawn, be sure to subscribe to my newsletter. Until next time, clear skies!
Related Posts
Source: https://astrobackyard.com/sky-watcher-eq6r-review/
0 Response to "Sky Watcher Eq6 R Pro Equatorial Go to Mount Review"
Postar um comentário